We use cookies to try and give you a better experience in Freshdesk.
You can learn more about what kind of cookies we use, why, and how from our Privacy policy. If you hate cookies, or are just on a diet, you can disable them altogether too. Just note that the Freshdesk service is pretty big on some cookies (we love the choco-chip ones), and some portions of Freshdesk may not work properly if you disable cookies.
We’ll also assume you agree to the way we use cookies and are ok with it as described in our Privacy policy, unless you choose to disable them altogether through your browser.
Integrating DocuSign with TPS Cloud Axis facilitates the process of requesting eSignatures for your firm and ensures that all relevant information is stored in the TPS Client Portal, thereby improving overall management capabilities. Effortlessly request eSignatures for important documents right from the TPS Client Portal section.
Adding signature placements with the DocuSign variables is optional. If you prefer not to use them, clients will be able to sign the file on the last page of the document.
In the TPS 'Client Portal', choose the document and under the 'Sign' option select 'DocuSign'. Input the name you want to assign to the document 'Name of Agreement', select the 'Participants' from the 'Contact' icon and 'Send the Agreement' eSignature request.
The contact will receive an email requesting for their signature on the last page of the document.
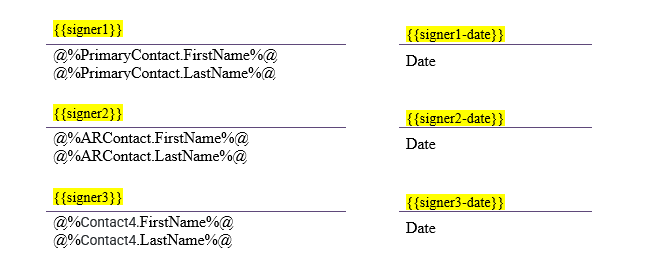
TPS Cloud Axis includes two variables for TPS Templates: signature and signed date, both of which are filled in automatically by DocuSign. The firm manages where these variables are placed in the TPS Templates or the document (PDF) to indicate where each signature and the signed date should appear. You can copy and paste these variables into the document as needed.
The DocuSign Signature Placement Variables vary based on the number of signatures required.
{{signer1}} {{signer1-date}}
{{signer2}} {{signer2-date}}
{{signer3}} {{signer3-date}}
If you are using a TPS Template, edit the template to insert the variables. Once saved, upload the template in Tools - Template - Custom Letters. Then, you can generate and create the document with the 'Print/Send - Mass Mailing tab' - 'Template' selection to create and send the file to the Portal.
In the Client Portal, you can designate who will sign in the pre-established variable fields. Use the 'Add' option to increase the amount of signature fields required.

Note: Ensure that the variables are added to the template or document before uploading it to the Portal. The example provided above shows how to add DocuSign variables to a TPS Template. However, users can also include these variables in any other document, save it as a PDF file, and upload it to the Portal to request the eSignature.
Easily check the status of the eSignature requests or download signed documents by navigating to the 'Client Portal - Signatures' Tab.
In TPS Cloud Axis locate the 'Tools' menu, click on the 'Integration' and select 'Configure'.
Locate the DocuSign feature to 'Enable' the integration using your DocuSign account credentials.
Your firm is now ready to empower the staff with the efficiency of TPS Cloud Axis and DocuSign integration. Experience the ease of document management and eSignature features within the TPS Client Portal integrations – where all client documents are just a click away!
Related Articles:
axis_support@tpssoftware.com
Toll-free: 1- 888-877-2231
0 Votes
0 Comments